Durian Cheese Pie


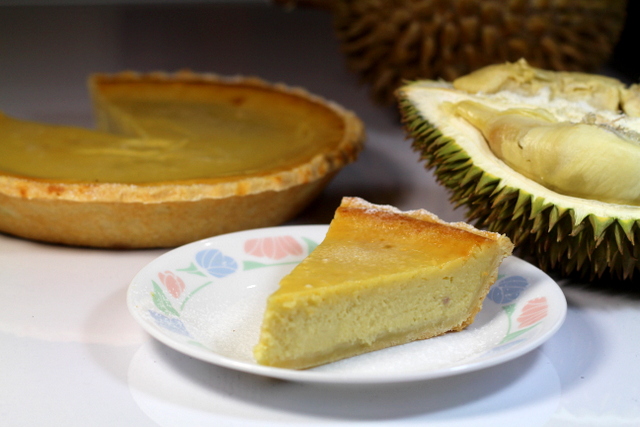
     Mr Thorny Guy is back in season. I have stopped counting how much of those sinful but delectable creamy flesh I've eaten, not forgetting all those pengat, gulai, cake, cheesecake that were made with happiness and guilt at the same time. I even stopped buying durians but since a dear friend of mine had generously given me some and to prevent that pleasantly pungent smell from continuously wafting in the house, I just had to make something - durian pie. 


      The best crust for me is shortcrust. You can use a tart dough instead or a mealy pie dough (I'm not really crazy about mealy pie dough when it comes to sweet pies). If you don't have your own favourite pie crust recipe, click here.  Be warned not to overwork the dough and try to find unbleached flour if possible, not the ones mostly sold in our supermarket - wau, kunci, sauh etc etc (unless if you go to the organic section). 


     Prepare a 9" crust pastry. Brush the sides and edges with some milk or cream and bake for 10 minutes. You can use pie weights to prevent the pastry base from forming bubbles and air pockets.  For the filling:

1 stick (250g) cream cheese
1 cup granulated sugar
3 eggs
2 cups durian flesh (pureed in food processor)
1 cup cream


Using a flat beater, beat 250g cream cheese (room temperature) on low-medium speed  for about 2 minutes. Scrape the sides every now and then so that the mixture gets evenly mixed. Gradually add 250g granulated sugar into the mixer and continue beating for 2 or 3 minutes. You should have a creamy and smooth mixture. At this point, add 3 eggs, one by one. Add durian flesh and cream.  Pour mixture into the pie shell and bake for 30 minutes or until the centre is set but slightly wobbly. As it cools, it will set further. If you're chilling it, place it in an airtight container as its odor will permeate other food in the fridge.


Rice Pudding


       To turn rice into pudding is not something that I normally do. Fermented rice (tapai) and rice crackers (kerepek beras) are the only rice-base sugary snack I imagine eating. Rice pudding doesn't really excite my palate. Somehow, I received a challenge to create a pudding made from Sarawak rice. In Bario, Sarawak, people grow red and black rice. Mind you, they are nothing like our 'pulut hitam' (which is sticky and heavy) as their rice is very high in fibre, making it a hearty and healthy meal. 
    After some trials and errors, I finally come up with this simple, yet lovely warm dessert recipe. But it has to be eaten immediately while it's still warm. And adding fresh fruits will certainly enhance its taste. Go for something sweet and soury to accompany it. This recipe is enough for two.
    
Ingredients
50g rice (white, red or black)
300ml milk
300ml water
2 tbsp sugar
pinch of salt
1/2 tsp nutmeg powder
1/2 tsp cinnamon powder
few drops of vanilla essence
50-100g of coarsely chopped fruit of your choice 

Garnishing
Toasted desiccated coconut and toasted flaked almonds 
Fresh fruits and cream OR ice cream

Instructions
Wash rice and toss it. Add all ingredients in a pot and cook over low flame. Stir occasionally. When the mixture begins to thicken, stir continuously and when the rice has soften, remove from heat. Scoop into a serving dish and top with your favourite garnishing. 


LAVA CAKE...


      Kek Lava yang sangat enak...oozing with goodness. Namanya pun lava sebab bilamana dipotong sahaja bahagian tengahnya, maka keluarlah cairan bak gunung berapi yang boleh melemahkan semangat mana-mana penggila coklat dan dessert. Setengah jam saja diperlukan untuk menyediakan dessert ini. Jadi, paling sesuai untuk last minute dessert (kalau tetamu datang secara tiba-tiba) tapi nampak sangat impressive, lebih-lebih lagi jika diletakkan strawberry atau raspberry diatasnya. Resepi ini dari Pastry Arts Academy dan insyaAllah jadi kalau ikut saja steps yang diberi.

      Caranya, yang petama, di dalam double boiler, cairkan 230g dark chocolate (compound, tapi jika couverture yang disukai walaupun mahal, silakan) dan 225g butter. Masukkan 250g gula halus atau caster dan kacau hingga gula larut. Padamkan api dan steps seterusnya amat penting di mana 210g putih telur dimasukkan perlahan-lahan ke dalam double boiler (api dipadamkan tetapi periuk air di bawah jangan dialihkan) dan pastikan terus mengacau sehingga adunan jadi agak likat sedikit. Jika dikacau tidak berterusan nanti putih telur akan berketul-ketul dan tak rata.  Boleh alihkan mangkuk tu dari periuk dan ayakkan 120g tepung (gandum/superfine) ke dalam adunan tadi. Kacau rata.

     Seterusnya, masukkan adunan ke dalam mangkuk pembakar yang kecil atau ring mould. Saya gunakan souffle cup seperti di bawah, cukup untuk 1 serving:


    Brush dulu bahagian dalam dengan  butter dan tabur sikit tepung (kalau nak serve terus tak perlu tabur tepung sebab tepung tu untuk memudahkan bila kita invert atau keluarkan kek dari bekas). Pastikan oven dah preheat 180C. Step penting seterusnya, jika terus dibakar selepas siap adunan (maksudnya adunan masih lagi suam) bakar 13-15 minit. Jika adunan dah sejuk sikit (dibiarkan sejam lepas dibuat contohnya0, bakar 15-18 minit. Jika dah disimpan dalam peti sejuk, bakar 18-21 minit.

    Sambil menunggu kek masak, pukul whip cream dan bila kek masak, terus hidangkan. Boleh tabur icing sugar sikit (kasi cantik), letak whip cream dan susun strawberry atasnya. Untuk kek lava yang lebih, yang disimpan dalam peti sejuk,  panaskan saja dalam microwave sebelum dimakan, nanti lavanya akan cari semula. Jadi maksudnya, bolehlah dibuat sarapan pagi bersama secangkir kopi.


GOLDFISH CAKE


   This is a pretty simple cake to make. To achieve that nice curvy sides, cover the cake with ganache made of 1 part of cream and 2 parts of dark compound chocolate. The ganache will be firm enough to hold the fondant but still soft to be shaped with spatula. Brush the surface to get a smooth effect before covering it with fondant.  Use airbrush to colour the fish. It's a fun project!

MURTABAK MAGGI ANYONE?


      ...One of the simplest snacks ever that simply oozes with delightful melted cheeses. The noodles would sometimes go unnoticeable and once even mistaken for macaroni! If you're not into Maggi mee, perhaps other dried noodles can be used (never tried this though). I bought the packet with no seasoning included because I would rather use my own curry powder and seasoning. Your choice though.
         
      This recipe is just enough for 4 hungry kids. Boil 2 pieces of Maggi and toss it. Meanwhile, in a hot pan, using a little bit of oil, stir fry 1 chopped red onion, 1 crushed garlic, 1 chopped red chili, a tablespoon of curry powder. When the mixture is fragrant, add a teaspoon of chicken stock and remove from heat. In a large bowl, beat 4 eggs, some salt and add the stir-fried mixture and Maggi into it. You can also add some mix vege or sliced button mushroom. 

     Heat a pan with some oil or butter and fry all to get a thick piece or make 2 pieces if you wish. I like mine thick fried over low heat and covered with lid so that it is cooked evenly. Overturning the piece may require some skill and confidence but as long the bottom side is well-cooked then it is sturdy enough to sit on a spatula while it is being flipped.

    Just before serving, drizzle some chili sauce and you'll have a wonderful smell and sight on a plate.
      

STEAM CHOCOLATE CHEESE LAYER CAKE


      Steam cake was the first cake I knew when I was a child. Apparently, a decent oven was a pretty fancy gadget to be in any household during the 70s. We did have an oven though, the black butterfly oven for kerosene stove. Though humble as it may look, it managed to help my mom do wonders in the kitchen. 


      The steamer pot was as much useful as the oven. Though it was pretty dented up especially on the lid, it steamed the perfect paus, fruit cakes, chocolate cake, traditional kuihs and countless of other dishes that would leave me drooling just reminiscing about it. I too, own sets of steamer pots (and oh, the electric steamer seems very appealing to me), 4 to be exact, each of different size. 

    Somehow I find steam cakes a perfect serving for tea. They are moist, rich and tender just as they are and in no need of heavy frostings and fillings. Of course, a little chocolate drizzle atop a steam chocolate cake would do no harm though. It simply adds to the sinfulness of the cake.

   As for today, I am sharing with you a wonderful recipe that would make any chocolate and cheesecake lover smile over the simplicity of its recipe and preparation. 

   Line a 9" square pan with parchment paper. Prepare a steamer pot with enough water to steam for 45 minutes or more. For the chocolate cake layer, beat 3 eggs with 300g of fine sugar and a teaspoon of vanilla essence until pale and fluffy. Pour a cup of milk and half cup of hot water into the mixture and continue mixing it slowly. Then add 200 g of melted butter, followed by the dry ingredients which are sifted - 160g flour, 4 tablespoon of cocoa powder, 1 teaspoon baking powder and 1 teaspoon baking soda. MIx well and divide into two portions. Pour a portion into the cake tin and steam for 15 minutes.

    For the cheese mixture, cream 375g of soften cream cheese with 80g of fine sugar. Add a little bit of vanilla essence. Add 1 1/2 tablespoon of cornflour and a tablespoon of fresh milk into it. Mix well and pour onto the chocolate layer that has been steamed. Steam for another 15 minutes then layer it with the rest of the chocolate cake batter and steam for another 15 minutes. Remove from steamer and cool. If you fancy extra layers in your cake, you can simply divide the batter into 5 layers, perhaps. 
    
     Simply a steamy affair.

     
MYNN

Durian Crepe


Durian eaters have gone into this durian crepe frenzy.  I normally have this thin pancake filled with a variety of savoury and sweet fillings - nuts, fruits, ice-cream, cheese, beef - but never with durian. So I figured why not give it a try.  After all, it is the durian season (I guess my durian panna cotta had to wait).  So I got myself some musang king durians (this must be one pricey fruit crepes ever)...the fleshiest and creamiest ones, and started whipping up things. The result: A delightful combination of that rich fruit pulp and custardy cream. Best eaten chilled. 


Crepe
1/3 cup flour1/3 cup rice flour1/3 cup custard flour1 egg
salt
few drops yellow colouring
100ml fresh milk
100ml water (more or less)
butter (to brush on pan)


    Mix all ingredients in a blender and pulse for a while. Use a strainer to ensure mixture is thoroughly smooth. A non-stick pan comes in handy when making crepes or pancakes. You just need to brush a little bit of butter on the pan and heat it very warm. Use a 1/4-cup size container as a scoop and pour onto the pan. As you begin to pour it, immediately move the pan around as to spread the batter thinly and evenly. Lift when all parts are cooked and dry. When placing the pieces on a plate, ensure there is a plastic sheet in between each piece so they don't stick to one another. This could also prevent them from drying out. 

Pastry Cream
3/4 cup sugar

1/2 cup cornflour
1 cup fresh milk 
1 cup water
few drops vanilla essence
3 eggs

     Again, mix all in a blender and pulse. Pour into a pot and turn on the stove. Use a whisk to prevent curdling and as the mixture thickens, whisk it vigorously. Remove from heat and after 5 minutes, add a spoonful of butter. Whisk until all are mixed well. Set aside to cool. In the meantime, whip up a cup of non-dairy whipping cream (I use Rich) and fold the whip and pastry cream together. 

   Now, to assemble the durian crepe. A dollop of cream followed by generous amount of durian flesh, then another dollop of cream on top. Fold in the opposites sides to get that fluffy square or rectangle pillows. Chill before serving. 


Making a flaky croissant with perfectly structured layers is one of the ultimate satisfaction in the art of bread and pastry baking. The inside should stretch as it is pulled apart followed by the instant aroma of the buttery and sweetness of this lovely pastry that fills the air much faster than the steam that emits from between the buttery layers of the flaky crusts.
There are many croissant recipes but I prefer this becaue it proves faster and it calls for a fewer ingredients. The folding part is 3 times single fold (if you’re unfamiliar with the rules of folding pastry, you can refer to this site  http://www.elclubdelpan.com/en/bread-encyclopedia/single-fold-or-tri-fold-method  ).  I do however,  make a book fold to my dough just to get that extra layers.  You can always experiment with the folding part to see the result you’ll get.
Ingredients:
Flour  500g
Sugar  50g
Salt  12g
Yeast  20
Water  300g
Butter for folding  300g OR 250g margarine

   The normal procedure for making bread dough is mixing the dry ingredients together. Then, in a mixer, put in the dry ingredients. Add a bit of water to it. Using a dough hook, knead at medium speed and slowly add water to it. Once all the water has been added to the flour, increase speed and knead the dough for about 5 to 7 minutes. . Rest dough in chiller for at least half an hour.
   Take the dough out and expand it into the best square shape possible enough to fit in the butter. The dough should be able to wrap the butter from all sides. Make 3 simple folds but remember to chill the dough at least half an hour in between each fold.
    After folding 3 times, take out the dough from the chiller and flatten to about 3 mm thickness. Cut into triangular shape.  Gently stretch each piece to lengthen it. Then, on a flat surface place the wider part facing you and the point away from you. Start shaping the croissant by rolling from the wider to the pointed end. You can either have straight croissant or a curved one by gently pressing the both ends together. Leave to proof for an hour and brush with egg wash. Bake for 180C until their colour turn golden brown.
   The best way to eat them is with the purest, creamiest butter while they’re still steaming hot.


BAGUETTE (2)


      Bread week was one of the weeks I looked forward to when I was at the Pastry Academy. The sweet aroma of freshly-baked bread that fills the air never failed to tantalize my palate any time of the day. Making this baguette was very exciting because we had to get the ingredients ready a day ahead - the bigga - and that was the first time I learned and used bigga. Perhaps this explains why this baguette is much lighter compared to the previous recipe. It has the irregular holes with a crispy crust. You should be able to break chunks off easily with your hands. 

Bigga: 1 day ahead
250g flour
150g water
2g yeast
* MIx all in a bowl. Cover with cling wrap tightly. Leave overnight.

Dough:
500g bread flour
15g salt
2g yeast
350g water
5g improver

    First, mix the flour with water. This is what is called 'autolyse'. Leave it in bowl tightly wrapped for 20 minutes. Then, dump everything in a mixer and knead on medium speed around 10 minutes. Proof the dough for 45 minutes.
    Flatten the dough on a floured workspace. Stretch and fold from each side (4 stretches and fold altogether). Cover with cling wrap and leave to proof again for 45 minutes. 
    Next, divide the dough into approximately 370-390 gm each. Round each dough and again, cover with cling wrap. Leave to rest for 20 minutes.
   The next step is shapint the baguettes. Flatten the dough, and roll it (like rolling a swiss roll, but press as each roll is complete). Roll the ctlindrical dough with your hands to reach the diameter and length that you desire. Spray with water and leave to proof for 30 minutes. Using a very sharp knife, make a few diagonal incisions on top of each loaf. Spray again generously and bake in a preheated 230C combi oven or 210C normal oven. 
   This recipe takes that 'extra' effort but rest-assured, the result is worth every drop of sweat that comes along in making it!

MARBLE PUDDING


    This marble pudding recipe can also be used to make puddings of other flavours - chocolate, vanilla, orange, peach etc. The most important thing is not to boil the jelly strips too long so as not to reduce the water too much. 
    The ingredients you need are a packet of jelly strips, a liter of water, a liter of fresh milk, a can of evaporated milk, 2 cups of sugar, a cup of custard powder, a tablespoon of cocoa powder mix with a tablespoon of hot water, 30 grams of melted butter, few drops of vanilla essence and 3 large eggs. 
     In a large pot, boil the jelly strips, sugar and vanilla until the jelly strips dissolve. In the meantime, mix the custard powder with milk. Then add the custard mixture into the jelly pot stirring continuously. Keep on stirring until the mixture thickens. Turn off heat. Keep on stirring the mixture and after 5 minutes add the melted butter and mix well. Take one third of the mixture and add the cocoa paste. 
   Use a 9 X 9 or 10 X 10 inch square tin as the mold. Begin with a scoop of vanilla mixture placed in the middle of the tin. Then on top of the vanilla mixture, place half scoop of the chocolate mixture. This is to create a zebra-marbled effect. Continue with this step until all mixture has been used. Shake the tin lightly to level the pudding mixture. Chill for at least 2 hours. Serve plain or with fruits. 
    This pudding can also hold its shape in a fancy mold. You can also use small dessert cups or aluminium cups as the mold. That would be great for tea and celebrations. Have a great pudding! 

The Kitchen Juggler's Blackforest Cupcake


Making a decadent cupcake requires just a little effort, in fact, it is pretty effortless I should say. These little cuppies are always able to delight the friends of my teenage daughters who regularly drop by after school. Instead of making a huge 9-inch blackforest gateau, I would opt for a dozen of these babies instead because I do not want leftovers piling up in the chiller! 
    The fastest way is to get a packet of chocolate sponge mix and just follow the directions on the packet. A 200g of sponge mix is more than enough to make a dozen of medium to large cupcakes. When you have the batter ready, fill up the cups up to two-thirds full. Bake as directed. Normally, the temperature I set for this cake is around 180-190C. Once the cake is done, let them cool.
    In the meantime, get the filling and topping ready. For the filling, pour a can of red cherries in a pot, and add 2  tablespoon sugar, a teaspoon of lemon or orange juice, a teaspoon of gelatin. Let the gelatin bloom for about 5 minutes. Then heat the pot and let the liquid reduce by half. Remove from heat, and mashed the cherries so that the filling can pass through a large round nozzle.
    For the butter cream, mix 150g of softened butter, 100g of icing sugar, few drops of vanilla essence. Whisk until fluffy.
    Using a nozzle with a round tip or a filling nozzle to inject the cherry filling into the cupcake. Using a star nozzle (or basically any pattern that you desire) pipe some cream around the edges of the cupcake. Then place some cherry filling in the centre to cover the hole made earlier. Grate some chocolate (or you can use chocolate rice) and sprinkle on top of the cupcake. 
    If you're not a fan of sponge cakes, any chocolate butter cake recipe will do. Happy trying!


Engagement Cake


As requested. An engagement cake from the lady.